For our final project in studio we had a lesson called "Ramp It Up" which was to locate a restaurant, ferry terminal, market and park on the site of the current Ramp Restaurant. The first 2 weeks of the project we broke into teams and did research. I was in the Ferry group and it was our responsibility to find out what was required at a ferry terminal, what was a good idea for a ferry terminal and what other terminal were like.
After research we broke into singles again and developed a manifesto for the project and started working on the laser cutter to come up with concept models. My final concept model (above) is based on the fact that I wanted to site to act as a gateway for the commuters and local that provided a fast highway and a slow interactive space.
Once I had my concept I went about reshaping the property. The diagram above is suppose to convey my rational behind it.
Here is my intermediate presentation on the project. At this point my restaurant and ferry were clear, but the park and market were not. I was still holding onto the literal gateway and my critique helped me drop that.
Here is a elevation shot of my final model. The main mass on the right is my market roof and the mass on the left is my restaurant with ferry business underneath. I like the individual forms, but I have to agree with my critters (the pet name for the people that review our projects) and that the structure need to interact with each other and the site more.
A close up of the restaurant in the model.
This is a perspective of the project as you are walking up the ferry gangway at high tide. I choose this perspective since it showed how the tide effected the shoreline.
This was my site contect model. I really like this model, but was rushed so I ended up using hot glue which left lots of glue strings on it.
Wednesday, December 06, 2006
Friday, December 01, 2006
Field of Tables
A quickie exercise for our Thanksgiving break was to plan and draw our Thanksgiving dinner table. We took photos of our table before and after the meal and then drew the before and after. This was mostly an exercise in drawing, especially movement and space.
Before Photo
Before Drawing
After Photo
After Photo
Before Photo
Before Drawing
After Photo
After Photo
Tuesday, November 21, 2006
Laser Cutting Cross Over
For the final main exercise for RePresentation there was a connection with Studio class. We used the laser cutter on campus as a tool to help us create and explore systems to help build a project.
This is the pattern for my first cut. The bottom right are a bunch of S curves with notches to allow interlinking. The top has a bunch of circles that I was planning on using to create some kind of DNA double helix things and the bottom right is a random geometric pattern. About half way through cutting the laser shifted and ruined a few of my S and almost all of my circles.
This is my second cut. The top right geometric patterns were suppose to be for a rotating market and the zig zags and square were for explorations for roof and wall systems. I did not use the Zig Zags as planned but they were a big part of my final studio project.
The Friday before Thanksgiving we pnned up all of our laser work to date for studio.
This was my first concept model of which, most of the major elements stayed.
Tuesday, November 07, 2006
Buddhist Church of San Francisco
Friday, November 03, 2006
Canons
For our second main exercise of RePresentation we teamed up and choose a building to analyze from a list our professor provided. There were 12 different architects with 2 buildings each. My partner, Lee, and I choose Rem Koolhaas and his firm OMA because we had just covered him in our theory class. We picked the Kunsthal because it sounded cool.
It turns out the building is very cool. For our presentation board we focused on 2 main items, circulation and buildings as art. In this case, pop art.
Thursday, October 19, 2006
Asian Art Museum
History class met at the Asian Art Museum. Instead of our typical lecture, we all met the professor at the museum and he gave us his own guide on the stuff we had been learnding about in class and he asked us to sketch something that interested us.
I sketched this boddisatvya (sp) becasue it reminded be of the Steely Dan song.
Wednesday, October 18, 2006
Pier 30/32
Our second main project for studio was to redesign Piers 30 and 32 keeping in mind our previous project and keeping it at a human scale. I still wanted to work on the co-dependent theme I had previously and I also wanted to keep the site as it is today. Which is to say as a flexible public space that can be used for concerts and parking and hanging.
My initial and final concept was to come up with a simple tent structure that could be used by a small group, but that could also be joined together and pull off much larger projects. Above is my final presentation for the project.
After I had the tent concept down I realized I needed to do something with the pier so I cut in 3 large notches and covered then with movable covers that can be rotated to act as gates, or lifts or sunning platforms.
However the main focus was still on the tents. This was a simple isometric diagram showing a scenario of an outdoor concert.
or for large private parties.
The best part was the space that the tents made when many of them were ganged together. Above are a few renders for what it might look like at large parties.
or as an emergency shelter.
I also made about a hundred miniature tents at 1/16" scale to show some spaces and allow others to move the tents around to make their own.
Tuesday, October 03, 2006
The Head Drawings
Our first major lesson for Re:Presentation was to draw our head, in portrait, profile and from the top. We weren't suppose to use anything but a mirror for the front, with maybe some help from cameras for the top and side. Most of us used cameras for all sides.
The first week we all turned in the basic s and it went well for those of us who didn't do anything too radical. A couple of peole got too creative and found it difficult to move on to the3 next level
For the second week we were suppose to find a system of relationships in our head that are typical to most systems (i.e. the head is 5 eyes wide) but specific to us. Above is my grid of measurements. I did not put up the actual drawings as they are very similar to the first weeks.
The 3rd time around he told us to transform them again but to be architectural. No one seemed to get the teachers hint that this was some kind of architectural exersice. I went about making a grid based on the most normal measurement I found the previous week and tried to draw me with straight lines and arcs based on the points form the grid. My hair was very popular.
For the final week we were to tranform it again. Based on a suggestion from a guest lecturer I used a brush and no measureing tools for this piece. The orange arcs are the completion of all the circles from the previous week and the blue piece are offsets of the large interior spaces to accentuate the new spaces created.
Wednesday, September 27, 2006
Blob Tents - 3D Mesh
For our final tranformation of the 3D mesh we went back to the 3 dimensional and were able to explore , bt this time we could use whichever material we wanted, we were not limited to newspaper. I was relieved as I found it difficult to express my ideas on paper without gravity to test my ideas.
I decided to make 2 "tents" with the fabric holding the poles and the poles shaping the fabrice and the 2 tents together making a 3rd shape.
I had difficulty in finding the right material and then getting it to stick together. Glue was too messy and even though my sewing was primitive it still could not solve my problem of hiding the seems, so I decied to accentuate them.
Even though each tent is the same in mateial, the difference is the placement of the poles. One on seems and one away from the seems, resulting is 2 dramaticaly different shapes.
A professor form the other studio, Chris Falliers, checking out Bens work.
Jess posing with his form.
Everyone was fascinated by what John had to say about his Sod tower.
Tuesday, September 26, 2006
Figure Drawings
For our first 3 fridays of RePresentation we did figure drawing. For the first friday we drew our hands. Which despite the fact that I've done it many times, it is still a great exercise. The remaining 2 fridays we had Eva come in and model for us.
Here are 3 five minute sketches on one page. I was proud of the compostion between the 3 and connecting them with the angle on the fly.
The second time aroudn I concentrated on spaces she made with her limbs.
This is my favorite of the whole exercise. She is sititng on the ground, leaning over her legs. We are looing between her torso, arm and leg at her head and ear.
Wednesday, September 20, 2006
Shaceship - 3D Mesh
For the second week of studio we were to transform out initial form, but this time only in 2D, on paper. I found this very difficult as gravity was a big part of my initial model and it's hard to draw gravity. After struggling for inspiration, I decided to use my own model as the inspiration using it as the starting point for the week.
Here is my pinup.
By drawing line segments from points off the previous unit and connecting them to make facets I came up with spaceship shape. This is a section cut lengthwise through the object.
This is a section cut width wise.
Finally a section of the piece made with leafs and twigs. I used these materials to hopefully soften the look of the project and ot realize that the object was just skin and bones.
Wednesday, September 13, 2006
Newspaper - 3D Mesh
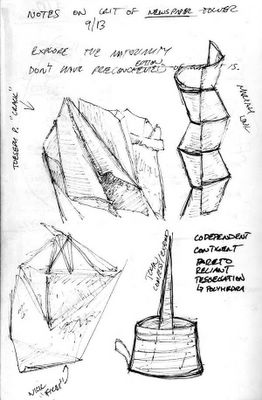
Our first assignment of the school year was to build something out of newspapers that was 10"x20"x30" and that was tied to an "operative" term, mine was Graft. Our first step was to make several sketch models to help us express our ideas and get use to the properties of newspaper.
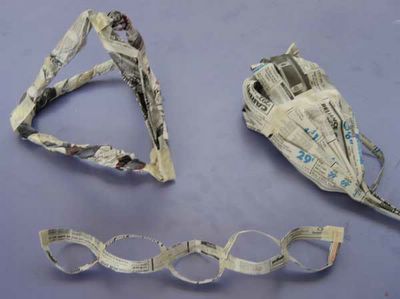
Above are a few of my models tat I did not use. The bottom one that looks like a chain was nice in that I grafted to strips together to form a kind of chain with with quarter spehre shapes, but ultimately I was intrigued by some co-dependent B's.
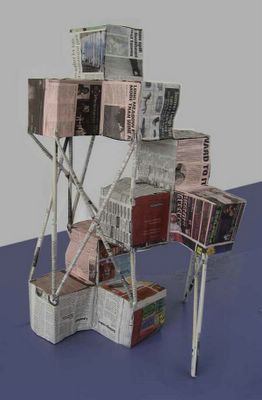
The process of how I got the final cube tower as well as the initial B is above. What I liked that was the B needed to attach to the others in order for it to stay up. My problem was that in oder to get to my target 30" height I needed some help.
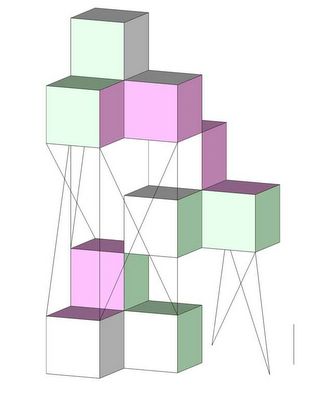
The plan was to use a set of stalks that would act as columns and would holp up the cubes, but I also wanted to have the cubes hold up the columns. Here is an initial Sketchup Model of my piece
The final piece
Sketches of some of my classmates projects.
Friday, September 08, 2006
Re:Presentation
I have Representation with Keith Plymale, who taught the summer class as well. I love the equation he put up during our lecture today.
Wednesday, September 06, 2006
Studio One
Studio is the main class of any architecture school and today was our first class. My section will be taught by Joe Sabel and Peter Anderson. The 2 minute bio of Joe is immortalized in my sketch above. Peter could not make it as he was in Venice at the Biennale.
Subscribe to:
Posts (Atom)